A failing auto exhaust flexible pipe introduces dangerous cabin leaks and harsh noise. It also generates excessive vibration throughout the vehicle chassis. Left unchecked, this severe movement can easily crack downstream catalytic converters. You might even destroy costly cast-iron exhaust manifolds in the process.
Replacing this critical component requires exact dimensional matching. You also need a thorough understanding of internal construction types. Drivers must evaluate these factors carefully to prevent premature re-failure. Many vehicle owners mistakenly install cheap generic parts. They often suffer frustrating exhaust blowouts within just a few months of installation.
This guide provides a robust technical evaluation framework. It helps you specify, select, and install the correct replacement part perfectly. You will learn to navigate material durability, evaluate internal structures, and verify specific fitment requirements. We will guide you toward a lasting, professional-grade repair.
Key Takeaways
Accurate Sizing is Non-Negotiable: Inner Diameter (ID) must precisely match your existing exhaust system's Outer Diameter (OD) for a secure, leak-free seal.
Internal Structure Dictates Longevity: Double-braided and interlock-lined pipes outlast single-braid alternatives, especially in high-torque or forced-induction applications.
Installation Method Determines the Buying Choice: Slotted ends are required for clamp-on installations, while straight extensions are optimized for welding.
Material Grades Matter: 304 stainless steel offers superior corrosion resistance compared to standard aluminized steel or 409 stainless.
The Diagnostic Problem: Why Exhaust Flex Pipes Fail
The flex pipe serves a very specific and punishing role. It isolates intense engine torque from the rest of the exhaust. Engines twist and rock on their mounts during heavy acceleration. Meanwhile, the rigid exhaust tubing remains bolted firmly to the vehicle chassis. The flex pipe bridges this dynamic gap. It absorbs thermal expansion as exhaust gases reach extreme temperatures.
Component failures usually stem from three distinct scenarios. First, you might notice fraying of the external wire braid. Road debris, steep driveways, or bottoming out often strip away this protective outer layer. Once the braid breaks, the inner bellow loses vital structural support.
Second, the internal corrugated bellow can crack from excessive mechanical stress. This specific failure frequently indicates worn or broken motor mounts. If your engine moves too much, it over-extends the flex pipe beyond its design limits. You will hear a distinct ticking sound during cold starts when this happens.
Third, localized corrosion eats through inferior metals over time. This leads directly to carbon monoxide leaks. These leaks often trigger failed emissions tests. Worse, toxic fumes can easily infiltrate the passenger cabin through the HVAC intake.
A successful replacement must meet strict criteria. It needs to restore original Noise, Vibration, and Harshness (NVH) levels. It must maintain factory backpressure specifications to keep the engine running efficiently. Finally, it needs to resist environmental corrosion caused by road salt and moisture.
Construction Types: Evaluating Stainless Exhaust Bellows
Understanding internal construction helps you avoid buying the wrong part. Different engines produce different exhaust velocities and heat signatures. You must match the internal structure of your stainless exhaust bellows to your vehicle's specific operational demands.
Single Braid (Economy/Standard)
This design features a bare corrugated inner bellow wrapped in an external stainless wire mesh. Manufacturers build these primarily for light-duty applications. They work acceptably well on naturally aspirated commuter vehicles. They represent the lowest cost option available. However, they carry the highest risk of generating annoying whistling noises. The exposed internal ridges create unwanted exhaust gas turbulence.
Double Braid (Heavy Duty)
The heavy-duty design sandwiches the corrugated bellows between an inner and outer wire mesh. This inner braid acts as a buffer layer. It smooths out the exhaust flow significantly. By reducing turbulence, you eliminate whistling and maintain better exhaust scavenging. This construction serves as the standard OEM replacement for most modern vehicles. It provides excellent structural integrity without breaking the bank.
Interlock Lined (Performance/High-Durability)
Interlock lined pipes represent the premium tier of exhaust connectors. Instead of an inner wire braid, they feature an internal flexible spiral-wound metal hose. The interlocking metal strips slide against each other. This creates an incredibly smooth path for exhaust gases. You should always choose this design for high-heat, high-torque, or turbocharged applications. Forced induction engines generate extreme exhaust velocity. The interlock design totally prevents the inner lining from collapsing inward under this intense pressure.
Below is a quick reference table comparing the primary construction types to guide your selection process.
| Construction Type | Internal Structure | Best Use Case | Flow Quality | Durability Level |
| Single Braid | Bare Corrugated Bellows | Light Commuters | Turbulent | Basic |
| Double Braid | Inner Wire Mesh | Standard OEM Replacement | Smooth | Moderate to High |
| Interlock Lined | Spiral-Wound Metal Hose | Turbocharged / High Heat | Excellent | Maximum |
Sizing and Material Evaluation Criteria
Selecting the correct dimensions dictates the success of your installation. Even the highest quality flexible exhaust connector will fail if sized incorrectly. You must approach the measurement process like a machinist.
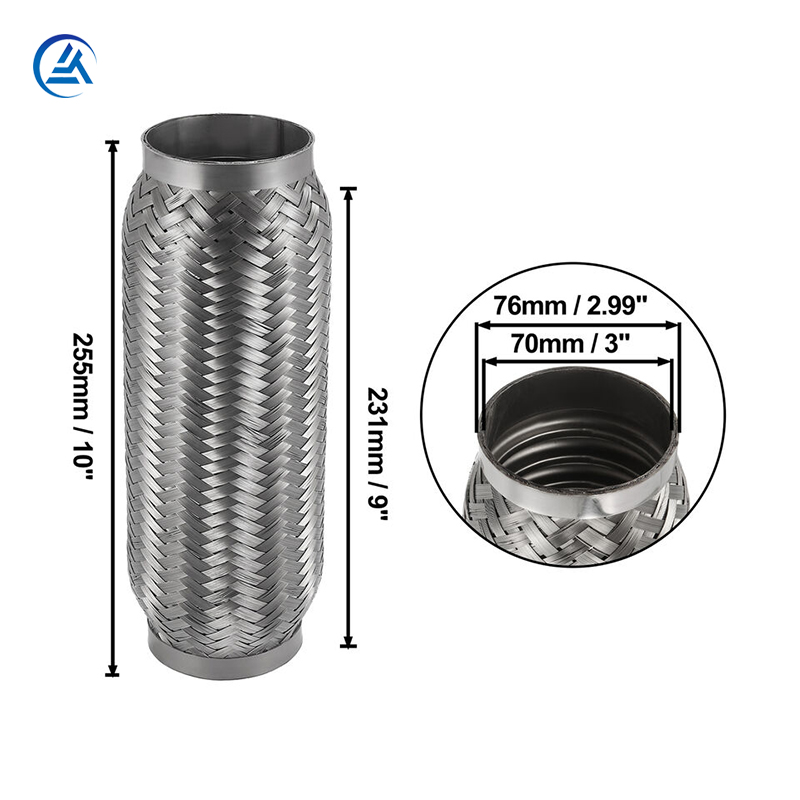
Dimensional Accuracy (ID vs. OD)
The golden rule of exhaust repair involves precise mating surfaces. The Inner Diameter (ID) of the new component must exactly match the Outer Diameter (OD) of the vehicle's existing tubing. If your car has a 2.5-inch OD pipe, you must buy a 2.5-inch ID flex pipe. This allows the new connector to slip snugly over the old pipe for a secure seal.
Follow these steps to measure your replacement correctly:
Clean the existing straight pipe near the damaged bellow using a wire brush.
Use digital calipers to measure the exact Outer Diameter (OD) of the clean pipe section.
Measure the total length of the damaged section you plan to cut away.
Add at least two inches to your total length measurement to account for the necessary slip-fit overlap.
Ensure you measure the total end-to-end length of the new part, including the rigid extension collars, not just the flexible braided section.
Metallurgical Considerations (Stainless vs. Aluminized)
Metals behave differently when subjected to extreme heat and corrosive environments. Your material choice directly affects how many years the repair will last.
304 Stainless Steel: This alloy contains high levels of chromium and nickel. It remains highly resistant to road salt, moisture, and chemical de-icers. It will discolor and turn a golden-brown hue under intense heat. However, it completely resists structural rust. You want this material for both the braided sections and the internal bellows.
409 Stainless Steel: This grade contains less chromium than 304. Automotive manufacturers use it heavily for factory exhaust systems. It will develop a layer of surface rust over time. Fortunately, it maintains its core structural integrity for years. Builders often use 409 stainless for the rigid end collars.
Aluminized Steel: This is standard carbon steel dipped in an aluminum-silicon alloy. It remains very budget-friendly. However, it is prone to rapid, destructive corrosion in wet or snowy climates. Once the aluminum coating scratches, the steel rusts through quickly. You should avoid this material for any long-term vehicle fixes.
Implementation Realities: Welding vs. Clamping
Your mechanical skill level and available tools dictate your installation method. Both approaches can work well if executed properly. You must match the physical design of the new auto exhaust hose to your chosen fastening technique.
Weld-On Connectors
Professional exhaust shops prefer welding. This method fuses the metals together to create a permanent, leak-proof seal. It also maintains the highest level of structural rigidity across the exhaust span. If you plan to weld, look for components featuring raw, non-slotted extension collars. Smooth collars provide the best surface for a continuous weld bead.
However, welding has notable drawbacks. It requires specialized MIG or TIG welding equipment. You also need extensive surface preparation. You must cut out the old pipe cleanly and grind away all rust down to bare metal before striking an arc. Poor welding easily blows holes through thin exhaust tubing.
Clamp-On Connectors (Slotted Ends)
Clamping provides a highly accessible, DIY-friendly alternative. You only need a reciprocating saw, safety glasses, and heavy-duty hardware. You slip the new connector over the old pipe and torque down the fasteners.
You must purchase a unit specifically marketed with "slotted ends" or "clamp-on extensions." Slotted collars feature precise cuts that allow the metal to compress inward as you tighten the clamp. Standard smooth-end pipes will simply buckle, crease, and leak if you try to clamp them.
Be aware of the risks. Clamps carry a higher risk of tiny micro-leaks. You should never use clamp-on connectors for pre-catalytic converter installations. Oxygen sensors rely on perfectly sealed environments. Even a microscopic exhaust leak ahead of the sensor pulls in fresh oxygen. This tricks the engine computer into running a rich fuel mixture, destroying your gas mileage.
Here is a diagnostic chart comparing the two installation realities:
| Feature | Weld-On Installation | Clamp-On Installation |
| Seal Quality | Permanent, 100% Leak-Proof | Good, but prone to micro-leaks |
| Tool Requirements | MIG/TIG Welder, Grinder, Shielding Gas | Reciprocating Saw, Socket Set |
| Required Design | Smooth, raw extension collars | Pre-slotted extension collars |
| Pre-Cat Suitability | Highly Recommended | Not Recommended (O2 Sensor Risks) |
Decision Framework: Shortlisting Your Exhaust Flex Pipe
Choosing the ideal exhaust flex pipe requires balancing your budget against your vehicle's specific needs. Use this framework to finalize your shopping list.
If you are a DIY Commuter looking for budget and ease, prioritize exact ID measurements. Buy a unit with slotted ends for a straightforward clamp-on installation. Use heavy-duty lap joint band clamps instead of cheap U-bolts to prevent crushing the pipe. A standard double-braid construction offers the absolute best price-to-performance ratio for daily driving.
If you drive a high-mileage vehicle in harsh winter climates, prioritize maximum durability. You must insist on full 304 stainless steel construction for both the bellows and the extension collars. Road salt destroys aluminized steel rapidly. Spending slightly more on 304 stainless prevents winter salt corrosion from ruining your repair after just one season.
If you own a performance, heavy-towing, or modified vehicle, prioritize flow and strength above all else. You should only shortlist interlock-lined pipes. Buy versions with smooth, weld-on extensions. The internal spiral design handles massive increases in exhaust gas temperatures. It easily withstands violent engine torque without collapsing or restricting turbo spool-up.
Conclusion
Selecting the right replacement component protects your vehicle from secondary damage and restores a quiet cabin. You simply need to match your personal installation capabilities with the specific operational demands of your engine.
Take action by measuring your current straight pipe's outer diameter using accurate digital calipers. Next, inspect your rubber engine mounts thoroughly. Replacing a broken pipe without fixing a torn motor mount guarantees the new pipe will tear apart shortly after installation. Finally, source a premium connector built with the appropriate grade of stainless steel to secure a permanent fix.
FAQ
Q: Can I drive with a broken exhaust flex pipe?
A: It is not recommended. It allows dangerous exhaust gases (carbon monoxide) to leak near the cabin and can cause false readings at the oxygen sensor, leading to poor fuel economy and potential engine damage.
Q: How do I know what size flex pipe to buy?
A: Measure the outside diameter (OD) of your straight exhaust pipe where you plan to make the cut. Buy a flex pipe with a matching inside diameter (ID). Measure the total length of the damaged section to ensure the new piece bridges the gap.
Q: Is an interlock flex pipe better than a braided one?
A: Yes, for longevity and flow. The internal spiral interlock design provides a smoother path for exhaust gases, reducing turbulence and preventing the internal collapse that sometimes occurs with standard inner-braid designs.
Q: Can you use exhaust clamps instead of welding a flex pipe?
A: Yes, but only if you purchase a flex pipe with pre-slotted extensions. Standard smooth-end pipes will buckle and leak if clamped. Welding remains the industry standard for a permanent, leak-free seal.


